
LP's to CD's - like magic
February 2007
 As Oldies we have, or at any rate tend to have, a collection of much loved vinyl LP’s recalling the enthusiastic flower of our youth through to the more discerning years of middle age and up to the point when the hi-fi industry invented CD’s.
They created CD’s, of course, to try and persuade us to buy the same music a second time, and many of us did. However, I now urge you to climb up into the attic and retrieve those LP’s, because this month we will tackle converting your old records into CD’s, mp3’s or any other sort of digital nonsense you might want.
What happens
You should understand the process. What is going to happen is that you will play the record to your computer, which will listen carefully, remember exactly what it hears (including any scratches, jumps and so forth), and convert it all into a digital code. You can then ask it to play it all back to you, or save it onto a CD, or an mp3 player (if you know what that is). Make sure that you computer has the ability to "burn" CD's; most do, but if yours doesn't, this isn't going to be much use to you.
It’s not too difficult, but a bit of technical know-how will help, so if you are nervous ask a techie friend to pop over and help set it up. The only thing to warn you about is that it is not a quick process, and takes at least as long to do as the LP's take to play. But you like listening to them anyway, don't you?
It doesn't matter what sort of computer you have, or what Operating System you use. They can all do it.
The equipment
First, of course, you need a turntable to play the LP on. Less technical Oldies with a few bob to spare could buy a USB turntable, which simply plugs into a USB socket (or "Port" as they insist on calling it) on your computer. That’s a little rectangular socket about half an inch across; you probably have a couple or more.
The trouble is that these turntables cost an absurd £120 or more (pure opportunism), but if you still have your old stereo system (with turntable), and if it has sockets called “line out”, you can use that. It's certainly what I do. Most systems that were not the cheapest will have these sockets, and they are perfect.
They will most likely will be two round sockets that take plugs that look like those in the picture on the right: 
These will plug into your stereo
All you then need is a cable to link these “line out” sockets to the “line in” socket on you computer. If it is less than about five years old, it will certainly have a "line in" socket somewhere. It will accept a 3.5 m stereo mini-jack - the sort of plug most earphones have; the socket will look something like the picture on the left:
The socket to look for on your computer
There may be a pair of them, one marked for microphone, and one for a "Line in" - and that's the one you want. You may well have to get a magnifying glass out to see the symbols; they are not generally designed for elderly eyes.
In short, the chances are that you need a lead that calls itself a "3.5mm Stereo Plug to 2 Phono" lead. These are not hard to find, but one respectable supplier is Maplin, and if you click here there's a good chance that you'll see the relevant page of their catalogue.
If you don't have a "Line out" socket on your stereo, but you do have an earphone socket, you can use that, but the results won't be as good, and volume is harder to control. In that case you will need a "3.5mm Stereo Plug to Plug" lead, which you can find on the Maplin site by clicking here.
In either case, make sure you buy one that is long enough.
The software
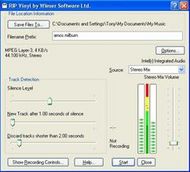
What RIP Vinyl looks like.So you've connected the two beasts. Now you need a bit of software on your computer to allow it to manhandle the music once it is stored there. There are lots available; I mostly use one called RIP Vinyl, which you can try for nothing and only costs £6.99 in any event. It’s British, too. It’s pretty basic, and real recording enthusiasts sneer at it because it has so few controls, but that’s what I like about it. It doesn't work for Apple computers, though - and I would welcome a recommendation from any Apple users as to what they find works well. Charles Paterson, a kind Oldie Apple user has already contributed some useful advice; click here for that.
The Rip Vinyl site has good instructions for the whole process (more detailed than these) and I recommend that you have a read before using the software. It is easy enough to use, but they have not been able to resist calling some bits by rather unnecessarily technical names. Just grin and put up with it - and if you are confused, this might be the moment to involve a geekier friend or young relative.
Now record the music...
The software is installed, and switched on. Now, put the needle on the record, and make sure that you can hear it playing through your computer loudspeakers. If you can’t, the problem will be something simple. Is the "Line In" volume turned up - and not switched off? This is where you might need the techie friend again.
Now you need to set the levels - place the needle at the loudest part of the record, and make sure that the level meters are not hitting their heads on the ceiling; adjust the volume slider control until they don't.
Once that is sorted out, all you do is put the name of the record in the box in RIP Vinyl labelled, unhelpfully, “Filename prefix” and select where the recording will be saved on your computer (click on “Save Files to…” and decide). Then start playing the record again and press “Start” before the music begins. Then press “Close” when it is over.
You’ve now created a recording of the performance you’ve just heard. If you read the RIP Vinyl Help file they will also show you how to create different tracks - rather than recording the whole record as one track. They claim you can set it to do this automatically, but I've never found that works reliably, and the best way is to hover over it and press the appropriate button at the right time.
...and put it onto a CD
Now the recording is done, you can now "burn" it that onto a CD, or put it to an mp3 player, if you are especially keen on impressing younger members of the family. Refer to the techie friend again at this point if nervous - the instructions you need will depend on the type of burning software you have on your machine.
Advanced stuff
Polderbits - a bit more complexIf you are feeling a bit bolder, and have some computer savvy, you might try using a Dutch programme called Polderbits which works very well, and includes the ability to filter out pop and crackles to some extent. The trouble is that it costs a fair bit more (30 Euros), is much more complicated to use, and the filtering is only marginally successful, in my view. But you can download a free version to try for a couple of weeks if you feel adventurous.
And finally...
 Don't forget that many historic recordings have been professionally cleaned up and put on cheap CD labels - you might do well to buy those rather than try to resurrect a very old and crackly record. In the classical, jazz and light music fields, Naxos in particular have made a speciality of this business, and it is well worth having a look at their range. A CD bought from them is almost bound to be better quality than any re-recording you can achieve yourself. And thanks to the fact that performaces drop out of copyright after fifty years, many magnificent historical reordings only cost a fiver or so.
So, dig out those LP's and start enjoying all that music again. And congratulate yourself on being a technical wizard.
